Using a Form
|
To do this … |
Do this … |
Requires Editing Access |
|
View errors in main form fields |
For most transactions, form fields with errors have a red background. Double-click on the error to see an explanation. Some forms mark errors with
|
|
|
Change data on main form page |
Replace the existing data and then click Save at the bottom left. If the data being changed is shared by other application documents in the transaction set (example: billing provider information), use the Form Actions section at the bottom to specify whether the change affects all related application documents, and then click Take Action. |
yes |
|
View or change other errors |
Look for other errors in these places: § An Other button at the top right (enable pop-ups for your browser). § An Errors not in Form tab at the top. |
|
|
Display the previous or next application document in the transmission |
Click Prev Record or Next Record at the bottom left. |
yes |
|
Save changes |
Click Save to save changed data to the TI database. This is stored separately from the original data, which can be displayed with the Restore to Original. If the data being changed is shared by other application documents in the transaction set (example: billing provider information), use the Form Actions section at the bottom to specify whether the change affects all application documents or just the current one, and then click Take Action. |
yes |
|
Validate changed data |
Click Validate. This invokes a command call to the re-validation installation of Instream. You can continue using TI while you wait for the revalidation to complete. After it has time to go through revalidation, you can see its new status at the bottom of the form:
You can also see it on the main My Tasks page. The status can be any of those listed in List of Statuses. |
yes |
|
Create a new EDI file from the corrected data |
This is available for data that has been corrected in the form and has passed validation. You can use the Submit button on the form or from the main My Tasks list. See Submitting Overview for details. |
yes |
|
Restore to Original |
Returns original data. Click Save to put it in the TI database. Restore to Original becomes available after a document is changed and becomes unavailable once the document is submitted. |
yes |
|
Cancel |
Discard unsaved changes and return to the document summary. |
yes |
|
Export to XML |
Use the Export to XML button at the bottom right to save or open the XML. Your specific browser controls how you do this. Not available on all forms. |
|
|
Export to PDF |
Use the Export to PDF button at the bottom right to create a PDF file. You do not need Adobe Acrobat Reader to save the PDF, but you do need it to view the PDF after creating it. Not available on all forms. |
|
|
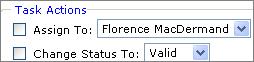
View or change the status, priority, or team member assigned to the document |
View or change them under Task Actions at the bottom. If you make changes, click Update. Watch the Change Status setting if you use the Validate button. |
yes |
|
Add or view comments |
View comments at the bottom. To add a comment, type it at the bottom of the page and click Add Comment. You can also see comments on the History tab. |
yes |
|
See all comments and actions taken for this task |
Click the History tab at the bottom. You can see a list of all comments and actions for this form under the History tab. Select Show all comments to expand the comments. Select Show Details about fields changed in the document to expand all the links below. |
yes |
|
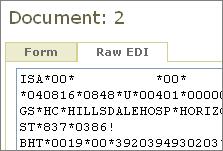
See the EDI |
The Raw EDI tab on a form shows the current EDI as it is represented on the form.
Ignore the SE01 segment count. It will be correct for validation and submitting. |
|
|
See repeating elements |
The Errors Not In Form tab and the Raw EDI tabs will show all repeating element data. The main Form tab will show the first element’s data. |
|

 Save
Save