Using the Main My Tasks Page
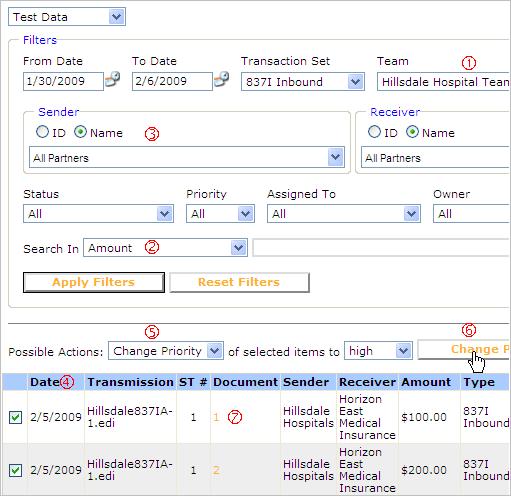
The main My Tasks page shows a list of documents that contain errors. Depending on permissions set by the TI administrator, you can use the page in these ways:
|
To do this … |
Do this … |
Number (see graphic below) |
|
Show task for another team |
Select the team at the top right. All teams to which you belong will be on the drop-down list. |
1 |
|
Filter by contents of Transmission, Document, or Amount columns |
Under Search In, choose a column. In the field to the right, type a transmission name, document number, or amount. Press Apply Filters. Example: to find all transmissions starting with Hillsdale837, choose Transmission/Document, type Hillsdale837* and press Apply Filters. The search may be case sensitive. Note the wildcard * at the end. |
2 |
|
Filter the list |
Select from the filters at the top and press Apply Filters. The page updates to show only documents that match the values that you selected. By default, you see only documents assigned to you that are not closed. |
3 |
|
Sort the list |
Click on a column heading. To sort in the opposite direction, click again. |
4 |
|
Assign tasks to team members |
Select checkboxes for all tasks to be assigned.
Under Possible Actions, choose Assign. Choose the team member in the field that appears after selected items to. Click Assign. The name will appear in the Assigned To column for the selected tasks. |
5
|
|
Change status |
To set status to reflect the current progress of one or more tasks: Select checkboxes for all tasks to be affected. Under Possible Actions, choose Change Status. Choose the status in the field that appears after of selected items to. Click Change Status. The Status column updates for the selected tasks. See List of Statuses. |
5 |
|
Change priority |
Select checkboxes for all tasks to be affected. Under Possible Actions, choose Change Priority. Choose the priority in the field that appears after of selected items to. Click Change Priority. The Priority column updates for the selected tasks. |
5 and 6 |
|
Unlock a locked document (see Locked by column) |
A document is locked when someone is editing it. It can be left in a locked state if a team member improperly exits a form (closing the browser while editing a form, without clicking Save or Cancel, for example). To unlock: Check with other team members to be sure that no one is currently editing the data in a form. Select checkboxes for tasks that are to be unlocked. Under Possible Actions, choose Unlock. Click Unlock. |
5 and 6 |
|
Validate a document |
After correcting data in a form (see Overview of Forms), you can validate directly from the form, or you can validate one or more documents here. Select checkboxes for tasks that are to be validated. Under Possible Actions, choose Validate. Click Validate. Look in the Status column to see if it passed. Results can be: Failed Systems error. Have your TI administrator check the event log. Invalid Data is still invalid. Valid Data is valid. You can now Submit (see below). Validating Data has not finished validating. Refresh the page occasionally until it changes to another status. See List of Statuses. |
5 and 6 |
|
Create a new EDI file for processing by non-TI systems |
After correcting and validating data (see above), you can re-assemble full EDI files and place them in a directory designated by your Web.config file. For details, see Submitting Overview. |
5 and 6 |
|
Display application document details |
Click its number in the Document column. See Displaying Application Document Summary Details. |
7 |